Master the Art of Creating Custom User Defined Functions with VBA
Table of Contents
Introduction to User Defined Functions
Excel’s built-in functions are powerful, but sometimes you need something more specific to your needs. User Defined Functions (UDFs) allow you to create custom functions using VBA that can be used just like Excel’s native functions. Whether you’re a scientist, engineer, statistician, or accountant, UDFs can help automate complex calculations and save time.
What You’ll Learn
- How to create custom Excel functions using VBA
- Function syntax and best practices
- How to document and categorize your functions
- Distribution methods for sharing your UDFs
Functions vs Procedures
Functions and procedures both perform tasks, but there’s a key difference:
- Functions: Return a value (like Excel’s SUM function)
- Procedures: Perform actions but don’t return values
Function Limitations
Function Syntax and Structure
Basic Function Syntax
[AccessModifier] Function FunctionName([parameters]) As DataType
    [Code]
End Function
Syntax Components:
- AccessModifier: Public, Private, or Static
- FunctionName: Name of your function
- Parameters: Input values (optional)
- DataType: Type of value returned (Integer, String, etc.)
Access Modifiers Explained
Public Access Modifier
Public: The function can be accessed from any module in the current workbook. This is the default if no modifier is specified. Public functions appear in Excel’s function list and AutoComplete.
Private Access Modifier
Private: The function can only be accessed from procedures within the same module. Private functions won’t appear in AutoComplete or the Insert Function dialog.
Static Access Modifier
Static: Variables retain their values between function calls, unlike normal functions where variables are cleared after execution.
Function Naming Rules
Naming Guidelines:
- Must start with a letter
- Can contain letters, numbers, and underscores
- Maximum 255 characters
- No spaces (use underscores: Forecast_Sales)
- Cannot contain: . # $ % @ ^ * !
- Case insensitive
- Avoid names that match built-in Excel functions
Creating Your First UDF – Step by Step
Let’s create a simple function that calculates the cube of a number.
-
Create a New Workbook
Open Excel and create a new workbook for your UDF development. -
Open VBA Editor
Press Alt + F11 to open the Visual Basic Editor. You should see the Project window with your workbook name and worksheets. -
Insert a Module
Click Insert > Module to create a new code module.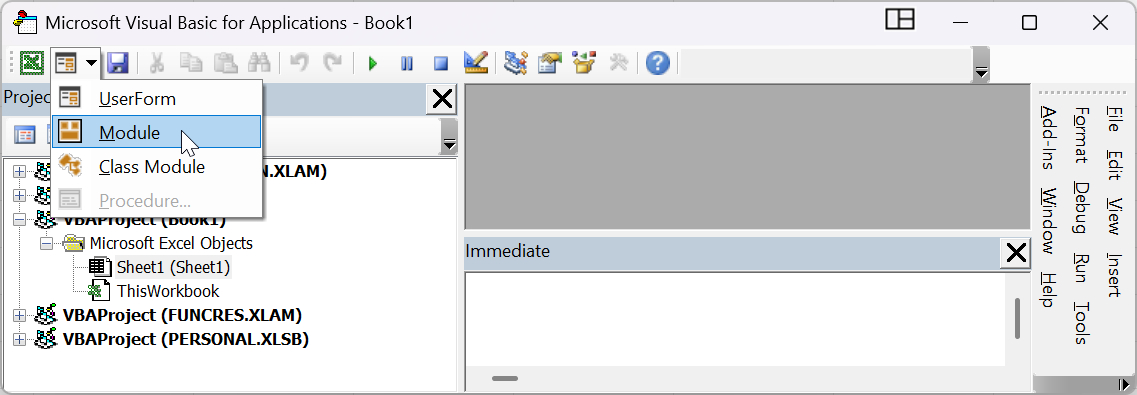
-
Write Your Function
Type the following code in the module:Public Function CUBENUMBER(value) As Long
‘Returns the cubed value of a number
CUBENUMBER = value * value * value
End Function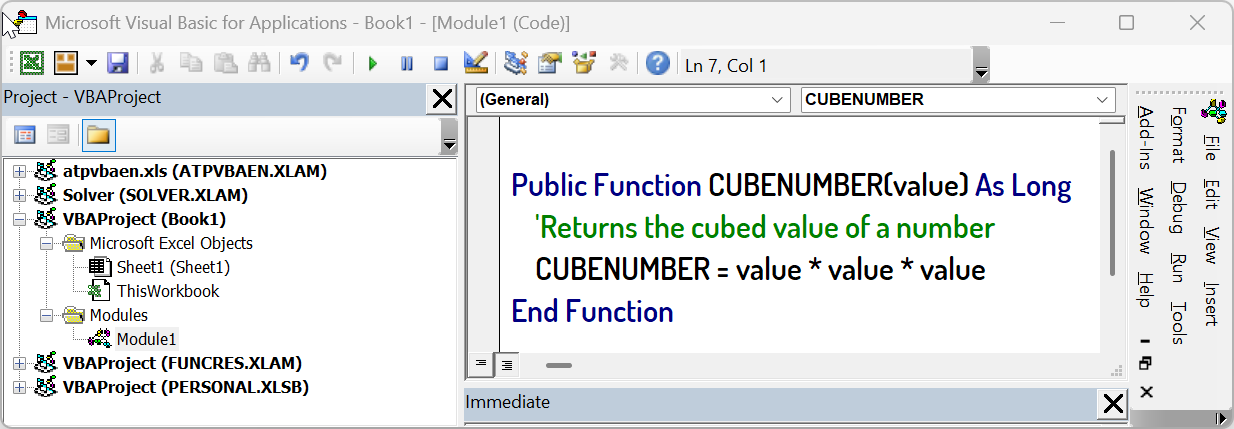
-
Return to Excel
Press Alt + F11 or click the Excel button to return to the worksheet.
Testing Your Function
-
Use AutoComplete
In cell A1, type=cuben. Excel’s AutoComplete will show your function. Press Tab to select it, then type5)and press Enter. Result: 125 -
Reference Other Cells
Put the number 6 in cell D2. In cell B4, type=CUBENUMBER(D2)and press Enter. Result: 216
Using the Insert Function Dialog
- Click in cell B6
- Go to Formulas tab > Insert Function
- Select “User Defined” from the category dropdown
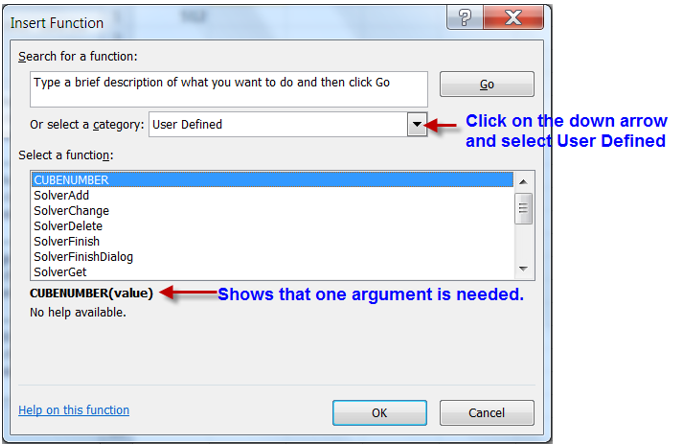
- Select CUBENUMBER from the function list
- The Function Arguments window appears. Click OK and enter whatever value you want to cube in the value textbox.
Enhancing Your UDF with Documentation
Adding Function Descriptions
You can add descriptions to your functions using the MacroOptions method:
Dim ArgDesc(0) As String
ArgDesc(0) = “A number that you want to find the cube of”
Application.MacroOptions _
Macro:=”CUBENUMBER”, _
Description:=”Function takes a value and cubes it.”, _
Category:=”My Category”, _
ArgumentDescriptions:=ArgDesc
MsgBox(“Function information has been added”)
End Sub
Categorizing Your Functions
You can organize your functions into Excel’s built-in categories or create custom ones:
Function Category Reference
| Category Number | Function Category |
|---|---|
| 1 | Financial |
| 2 | Date & Time |
| 3 | Math & Trig |
| 4 | Statistical |
| 5 | Lookup & Reference |
| 6 | Database |
| 7 | Text |
| 8 | Logical |
| 9 | Information |
| 14 | User Defined |
Saving and Distributing Your UDF
Save as Excel Add-in
-
Save as Add-in
Go to File > Save As, and select “Excel Add-in (*.xlam)” as the file type. Excel will automatically save it to the Add-ins folder. -
Install the Add-in
Go to File > Options > Add-ins. Select your add-in and click “Go” to install it. -
Share with Others
Distribute the .xlam file to other users who want to use your functions.
Best Practices for UDF Development
Tips for Success:
- Use descriptive function names
- Add comprehensive documentation
- Handle errors gracefully
- Test thoroughly with various inputs
- Consider performance for large datasets
- Use appropriate data types
- Version control your code
